Wednesday, February 28, 2007

When the My Computer (Get Files) Applet Fails

Students and faculty have reported difficulty in uploading files into Blackboard CE (such as when a student tries to submit an assignment in the Assignment Drop Box or attach a file to a Discussion posting or to an email message using the Mail tool. Often the Get Files button works once and then subsequently fails or just doesn’t work at all. In other cases the My Computer Applet (in the Content Manager and the File Manager) freezes when instructors try to upload files. In each of these cases, we’ve found the “culprit” to be a version of Java higher than Update 7 or the installation of multiple versions of Java (e.g. upgrade 6 and 10 installed on the same computer – because the Java installer doesn’t automatically delete the earlier version).

The problem typically happens only with the My Computer applet when using Internet Explorer. Most frequently the user is not able to continue using Blackboard CE until they close the browser and log back in.

According to a Blackboard Support Bulletin, from a technical stand point, the clients affected seem to be those using a Windows XP system with hyper-threading turned on while browsing the site using Internet Explorer and running Java 1.5.0_07 (called Upgrade 7) or higher. That’s why we’ve suggested to JCCC faculty, staff and students that they stay with upgrade 6 and not upgrade Java further, but this also means turning off the automatic upgrade feature…yet another hurdle for users to jump.

According to Blackboard, they are “currently working to identify a resolution for this problem. Microsoft has released a Knowledge Base article describing the problem. For more information regarding the underlying cause of the problem please reference this bulletin (http://support.microsoft.com/kb/327809/en-us).”

Blackboard suggests as a workaround that users either:
  1. Turn off hyper-threading on their system (not recommended by JCCC due to its complexity) or
  2. Change the Windows “view” from Windows XP to “classic”

The second option is quick and requires less technical knowledge. It appears to resolve the issues listed above, even on hyperthreaded/dual-core machines running Java update 10 or 11.

To switch the Windows “view” from Windows XP to “classic” you would:

  • Right click on the desktop
  • Select Properties
  • In the Themes tab, select "Windows Classic" in the theme dropdown
  • Click Apply

If you have students who experience problems uploading or attaching files, you may want to suggest they try these steps.

Tuesday, February 27, 2007

Opening Office 2007 Files from Students

Sooner or later, your students are going to start submitting files created using Office 2007 rather than Office 2003 (the current version supported on campus). If you do not have access to Office 2007 (like most computers on campus), you can still open Office 2007 documents if you first install a Compatibility Pack from Microsoft.

You can download it from: http://www.microsoft.com/downloads/details.aspx?FamilyId=941B3470-3AE9-4AEE-8F43-C6BB74CD1466&displaylang=en

If you’re a user of Microsoft Office XP or Office 2003 programs (Word, Excel, or PowerPoint), you’ll need to install all high-priority updates from Microsoft Update before downloading and installing the Compatibility Pack.

After installing the upgrade you’ll be able to open, edit, and save files using the file formats new to Word, Excel, and PowerPoint 2007. The Compatibility Pack can also be used in conjunction with the Microsoft Office Word Viewer 2003, Excel Viewer 2003, and PowerPoint Viewer 2003 to view files saved in those new formats.

Monday, February 26, 2007

Blackboard and Windows Vista

Many computer manufacturers are now delivering new computer systems with Windows Vista pre-installed, so you may be wondering if Blackboard CE is compatible with Windows Vista. Here’s what Blackboard support has indicated:

Blackboard has been conducting ongoing tests with Beta versions of the MS Vista product as part of the MS Beta program for some time now. However, there are often substantial differences between Beta software packages from Microsoft and their final versions. ...Microsoft's own early certification program kicked off only 3 weeks ago with the intention of getting their partners (Blackboard included) certified within 90 days of the release of Vista. Bb is not alone in this program as Apple, Adobe, SAP, and other vendors are all still working to certify and update their applications to accommodate the Vista OS.

So until we can complete certification by going through a full QA test cycle with the final version of MS Vista we can’t say that MS Vista is certified or compatible to use when running any version of Blackboard Academic Suite. Once Bb has certified this new operating system, a Support Bulletin will be issued on Behind the Blackboard and the associated end user documentation will be updated.

In some preliminary testing by Ed Tech Center staff, we found the following problems when using Windows Vista and Blackboard CE 6. We suspect there will be additional issues discovered as we test further.

For the testing we used Windows Vista Enterprise with Aero scheme, both Internet Explorer 7 with Java 1.5.0_06 and Firefox 2.0.0.1 with Java 1.5.0._06.

The following is a summary and each item and with the exception of number 6, the issues should be obvious and reproducible. Overall, we didn’t experience problems doing typical “user” activities, such as using the Mail tool, the Calendar tool, viewing content, and so on.
  1. WebDAV does not work.
  2. Webfolders do not work.
  3. Get Files (to upload files) displays only one line of files in IE7 with Java 1.5.0_06. However, it works when using Firefox.
  4. The Windows Vista Aero screen mode changes to Vista Basic View after logging in to Blackboard CE.
  5. PowerPoint slideshows display in PowerPoint 2007 (when installed) but not within the Blackboard browser window.
  6. There are intermittent buggy screen displays such as when the left menu completely covers the screen from left to right.

more information becomes available, we’ll pass it on.

Saturday, February 24, 2007

Backing Up and Deleting Courses

In case you’re wondering about standard operating procedure regarding when courses are deleted off the JCCC Blackboard CE server:

  1. Production “credit” course shells will be removed from the server about 1 month into the next subsequent semester, however, spring courses will not be removed until 1 month into the following fall semester.
  2. Each semester the academic director of the Educational Technology Center will alert faculty members about 2 weeks into the semester that courses will be deleted unless they request otherwise, e.g. to accommodate contract incomplete grades, self-paced courses, etc.
  3. Self-paced courses (950 sections) are the exception, they’ll stay online for a full year and a month after the start date, and then they’ll be removed.
  4. Before any course is removed a backup will be made by Academic Computing Services and stored. If backups are needed in the future, IS will retrieve the backups as needed.
  5. As an added precaution, faculty members are encouraged to backup their own courses after the end of each semester or after they make any significant changes to the course (e.g. add an epack, add a new module, make a significant revision, and so on). The backup made by faculty members should not be stored only in the course shell, but should be downloaded to the instructor’s workstation and then copied to media such as a CD or DVD. The instructor’s Ed Tech Center Designer can assist you with this process if needed.
  6. “Z - Dev courses” (those used for course development, will not be automatically deleted. Faculty members should periodically review their list of “Z – Dev Courses” (to determine if the development course shell is still needed) and when appropriate, request that the course data be backed up and deleted.

If the instructor needs a refresher on how to create a course Backup, there’s a Flash movie and PDF printout covering the process available at http://web.jccc.edu/edtech/notes/get.asp?DocumentID=177.

Instructors should be aware that the way to download the backup file to your computer is a little circuitous, but not hard.

  1. Once the Status of the backup is "Complete", you use the ActionLinks next to the name of the Backup file and choose "Save as File."
  2. Unfortunately, the only choices for where to put the file are My Files or Class Files (My Computer is not an option). We recommend choosing My Files.
  3. After saving the file (make a note of the filename), go back to the My Blackboard screen and click on the Content Manager tab - this accesses the My Files area.
  4. Find the backup (by filename), and use the ActionLinks to choose Download.
  5. You can now choose a location on your computer to save the file.

If you need assisance creating a CD or DVD copy of the backup file, please contact your Ed Tech Center Designer.

Friday, February 23, 2007

Difference Between Assessment Custom Instructions & the Description

In Blackboard CE’s Assessment tool, you can create both “custom instructions” and an assessment “description.”

Blackboard CE’s “Custom Instructions” may be different than you initially expect. It’s easy to expect “Custom Instructions” to show up on the Assessments page before students begin assessments. The fact is, “Custom Instructions” don’t appear until the assessment is started.

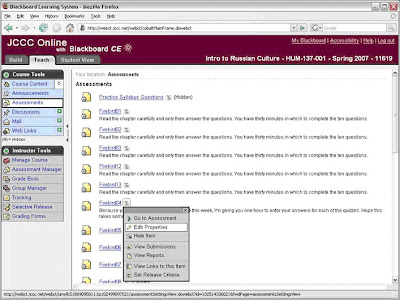
In order for notes or instructions regarding the assessment to show before the assessment is begun (on the Assessments page) enter them using the “Description” field (near the top of the assessment properties page) rather than the “Custom Instructions” field (at the bottom of the assessment properties page). Assessment properties are accessed by clicking the ActionLink icon and then selecting the Edit Properties option.

“Custom Instructions” appear inside the assessment (accented in green).


The description appears on the Assessments page, outside the assessment or before the assessment is begun.


To enter either a Description or Custom Instructions select the Edit Properties option using the ActionLink icon.


The Description field is near the top and the Custom Instructions section is near the bottom.

Thanks to Davy Jones, Senior Analyst in the Educational Technology Center for this tip.

Thursday, February 22, 2007

Minimizing Those HUGE PowerPoint Slideshows

In yesterday’s tip, we talked about factors that cause “slow” access times on the Internet. On big factor that an instructor/designer has control over is file size. All things being equal, the smaller the file size, the faster the download. I’ve seen faculty trying to deliver 25 to 70MB files (usually PowerPoint slideshows) using Blackboard CE and they wonder why students complain of slow download times. A simple solution is to reduce the size of your PowerPoint slideshow. A handy tool to accomplish that task is PPTminimizer (http://www.pptminimizer.com/).

PPTminimizer is installed in the Ed Tech Center labs (LIB 371 and 373) and in the Center’s Faculty Media Development Area (LIB 375). Stop by and we’ll show you how it works, or use the following instructions.

To compress your PowerPoint slideshows using PPTminizer:

  1. Open PPT Minimizer.
  2. Click the “Open Presentations” button
  3. Choose the PowerPoint file(s) you would like to optimize. You can select one slideshow to minimize or use the Add to List button to select multiple slideshows to minimize at the same time.
  4. By default the optimized PPT file will be saved in the same folder as the original. If you want it saved in another folder, select the “…” button (appears under the “Optimized presentations” button, and choose the folder into which you want to save the optimized presentations.
  5. If you select a different folder (not the source folder) into which to save the optimized file, you’ll see the “Add extension to Filenames” check box (found above the “…” button). Deselect if you do not ant the “(PPTminimizer)” suffix added to the filename.
  6. Next you can choose your compression settings. The default “standard compression” is usually a good choice. If you would like an even smaller file size then move the compression slider to “Strong Compression”. This setting may reduce your image quality and you should always check the optimized presentation when choosing “Strong Compression”. Further, if you find the images in your slideshow too pixilated using “Standard Compression,” lower the slider to use “Low Compression.”
  7. Click the “Optimize Presentations” button.
  8. If you are asked to confirm conversion of embedded objects, you should click the “yes” button in order to reduce file size. You will not be able to edit the embedded objects in the optimized file, but you can edit it in the original slideshow and run the file through the optimizer again when changes need to be made.
  9. Once the progress bar reaches 100% your file has been optimized.
  10. You’ll see three buttons: View Presentation(s), E-Mail Presentation(s) and Delete Presentation(s). Be sure to view your compressed slideshows to verify that they look satisfactory.
  11. Next you are presented with the statistics of the optimization including how much spaced you saved. Out experience is tat typical slideshows with graphics can be reduced in size easily from 60% to 95%.
  12. Your optimized file is placed in the directory you specified.

Try it, you’ll like it and so will your students.

Wednesday, February 21, 2007

Consider File Size!

Are your students complaining about slow download times when accessing PowerPoint slideshows in your Blackboard CE course? If so, you need to first understand file sizes. If you want to see a chart of equivalencies, e.g. how many kilobytes (KB) in a megabyte (MB), and so on, check out http://www.t1shopper.com/tools/calculate/.

The basics are obvious: it takes longer for a 5 MB file to download than a 1MB file and it takes longer for a 500 KB file to download than a 1 MB file. So smaller is better.

Also effecting the download time is the type of internet connection (ISDN, DSL, Cable, Dial-up and so on). You can determine your connection speed (it’ll be different in your office, on a laptop at Starbucks, or at home) by going to http://promos.mcafee.com/speedometer/test_0600.asp. Keep in mind that the access speed may vary each time you take the test (depending on factors such as time of day and network traffic). If you and/or your students are experiencing slow access, take the test several times (at different times when you might normally access the Internet) to get a sense of the connection speed at which you can expect to access online materials. You can also see the optimal speed for various types of connections by visiting http://support.primus.ca/en/dsl/speedtest.php (review the chart on the right side of the web page).

Your connection’s “optimal” speed is based on average network traffic between your computer and the server; obviously heavy network traffic or outages between your home/office and the Blackboard server (or any server on the Internet for that matter) can reduce the download speed (upload speed too).

Another factor is whether media is non-streaming (e.g. PowerPoint slideshows) or streaming (e.g. MP3 and Flash files). Streaming files start playing before the entire file is downloaded (so it appears to download faster) while non-streaming media must be completely downloaded before playing.

So, in a perfect world without heavy network traffic, without considering Blackboard or browser problems or any network disruptions, you can calculate the best possible download time for a file traveling from one location on a network to another by using the calculator at http://www.hp.com/hpinfo/abouthp/accessibility/webaccessibility/download_tool.html.

The calculator asks you to enter kilobytes, so remember that a one megabyte (MB) file is 1024 kilobytes (KB) and a 25 MB file is 25,600 KB. As an example, if you have a 25 MB PowerPoint slideshow (e.g. 25600 KB) and were using a DSL or T1 connection, it would optimally take 2000 seconds (or over 33 minutes) to download that single file. On the other hand, if the file were reduced in size to 1 MB (e.g. 1024 KB) using the same connection, it would take 80 seconds to download the file. Obviously slower Internet connections (ISDN, dial-up) would take significantly longer.

We’ve seen PowerPoint slideshows within Blackboard courses that range from 25 to 70 MB. In tomorrow’s tip, we’ll tell you how to reduce a PowerPoint slideshow file by 60-95%. Imagine how that will increase download times and reduce frustration!

Tuesday, February 20, 2007

Changing an Answer After an Assessment Has Been Administered

Let’s suppose that you have a fill-in-the-blank question in an assessment where you’ve indicated the correct answer is “criteria.” After some students have taken the assessment, you realize that “criterion” is also a valid answer. While it should be used cautiously, you can change the answers to a question (in this case add a correct answer). The process is anything but intuitive and requires these steps:

  1. On the Build tab, select the Assessment tool and locate the specific question.
  2. Select the question and the Edit…Question screen appears (you get to the same screen when you locate the quiz, display the questions, click the ActionLinks icon folloiwng the question and from the pop-up menu select Edit This Question).
  3. When the Edit…Question screen appears, change the title of the question; make it a minor change if you wish, such as adding a period (.) to the end of the title.
  4. Next add the new correct answer (if you change the correct answer from one choice to another, be prepared to tell students who lost points as well as alert those who earned points as a result of the change).
  5. Click the Save button to save the revised question.
  6. You’ll see a warning message indicating that you’re about to “overwrite the original question and could change Student grades.” Click OK if this is what you intend to do. In essence, you’re using a different question name and the revised question will replace the original question in the assessment.
  7. Next, select the Teach tab and go to the Grade Book.
  8. Select the ActionLink for the assessment that needs to be re-graded. It’s at the top of the column.
  9. From the ActionLink pop-up menu, select the View Submissions option. You can get to the same place if you go to the Assessment Manager, select the ActionLink behind the assessment name and then select the View Submissions option). On this screen you’ll see a little red double-cross symbol after each score indicating the assessment has been changed since last graded.
  10. Select the ActionLink in the top left corner of the screen (behind the assessment name) and select the Update All Outdated Attempts option. This option may take a few seconds to work and is not available except when you have outdated assessment scores.

By the way, the above works for other types of questions but is more complex (grading-wise) if you’re not just adding additional correct answers. For obvious reasons this option should be used sparingly if students have already completed the assessment. It can be confusing to students to find that what they “supposedly” answered correctly is actually incorrect.

Tuesday, February 13, 2007

Editing a Chat Log

Once you enable the Chat tool and chat logging, you may want to make the log available to students. You can simply enable it but a typical Chat room log may be confusing to read. By editing the log and posting it (for instance under a Discussion topic), you gain the ability to:

  • Clear the log after each session and preserve only particular sessions.
  • Edit the log as necessary and remove personal information added by students that should not have been shared online or delete student flaming (angry exchanges) or delete other inappropriate entries or language.
  • Trim the log of multiple entry and exits notations, and so on.
Here’s a way to edit and post the edited log.

Using FireFox:

  1. On the Teach tab, select the Chat tool.
  2. Click the ActionLink next to the desired room and select "View log."
  3. Right-click anywhere on the log itself.
  4. Choose "This Frame" and then choose "open in new window" or "open in new tab."
  5. Use the File -->Save Page As... command, choose a location to save to, and indicate a filename.
  6. From the “Save as type” drop-down list select "Web Page, HTML Only."
  7. You now have an editable text/html document that can be edited and then posted.
Using Internet Explorer:

  1. On the Teach tab, select the Chat tool.
  2. Click the ActionLink next to the desired room and select "View log."
  3. Right-click anywhere on the log itself.
  4. Choose “Select All” and then Edit --> Copy from the Browser menu bar (or Ctrl+C).
  5. Open Notepad, select the Edit --> Paste command (Ctrl+P) to add the text to the new Notepad document.
  6. Save the document using a filename you select (e.g. chatlog2-13-2007.txt).
  7. You now have an editable text/html document that can be edited and then posted.

With the new document open you can use Notepad or an HTML editor to clean it up. When done, you can:
  • Upload the file to the course and attach it to a Discussions posting or a Mail message.
  • Upload the file and link to it from within the course, e.g. learning module, folder, or home page.

For details on how to turn on Chat room logging, check out yesterday’s tip at http://ce-annotations.blogspot.com/search/label/chat%20log.


Logging Chat Sessions

You may or may not want all Chat room sessions logged in your course. If you have a session that is basically Q&A and not all students can participate because of the synchronous nature of a chat session, you can log the session. Those students who missed it can read the transcript at their leisure. On the other hand, if you set up a Chat room for students to casually chat (as a Student Lounge or whatever) you may not want to log that room.

If you click on the Chat link in the Build tab, you should see the current logging status for your chat rooms in the last column. If Logging is off and you want it logged,

  1. On the Build tab select the Chat tool.
  2. Select the ActionLink following the Chat room name you want logged and select the Edit Properties option.
  3. At the bottom of the options, select the More Options link to expand the options displayed.
  4. Under Enable logging, select the Maintain chat room log check box.
  5. Click the Save button to save your changes!

When the Chat room page reappears, the final column (Logging) should now be set to "on."

If you want all new Chat rooms to be automatically logged, from the Build or Teach tab, select Manage Course --> Settings --> Chat. Simply set the “Logging is on by default in newly created chat rooms” option to True.

If you want all Chat room logs to automatically be viewable by students you will need to also set the “Allow Students to view chat logs” option to True (also found under Manage Course --> Settings --> Chat). However, you may want to clean up the Chat room logs before posting. Tomorrow’s tip will cover how to edit the log before posting for students to view.

Thursday, February 08, 2007

Learning Modules, TOCs and System Exception Errors

If you are using a Learning Module (LM) in your Blackboard CE course and that LM includes 20 or more entries (e.g. headings, Web Links, HTML pages, Assignments, Quizzes, and so on), read on. These issues have come to our attention as we’ve taught the iTeach Online Workshop (formerly WebCeTera) and discovered additional flaws or bugs in Blackboard CE 6.1.1.

Background
Normally as you construct each module, the student would see a left-hand table of contents (TOC) that indicates every entry in the module. The entries in the TOC are hyperlinks to navigate through the module (skipping entries, viewing just the elements the student wants to review and so on). The TOC serves as a site map for the module. Normally, the student can quickly discerned the structure of each LM; e.g. the fact that each module starts with learning objectives, includes pages of content (text, PDF and Movie files) and ends with a page of assignments, module tips and maybe an assessment covering the module’s content.

The Problem
Due to a “bug” that cropped up with CE 6.1.1 (and was not present the last time we offered WebCeTera using CE 6.0.2) if you include the TOC as the first page of a LM or have it displayed in a left-hand panel and the student is using Internet Explorer, the student will get an “unexpected system exception error” each time they click a TOC link. Further, even though the message has a link to “Return to My Blackboard” that link simply displays another “unexpected system exception error.” The net effect is the student (designer and instructor too) must close the browser, log back in and if you try the same process again (even to access a different LM page), the browser crashes again.

Solutions
The only options to date are:

  1. Require everyone to use FireFox (which requires that it be installed and configured for Blackboard) – Firefox doesn’t encounter the same problem.
  2. Break each module into 20 or less entries; but that may require hours of rebuilding the course, cause an awkward separation of related information and may devastate the planned structure of the course (requiring changes in course syllabus and other instructions).
  3. Turn off the TOC and have students navigate blindly not knowing how many elements are in each LM. Additionally, the student will need to navigate the module sequentially to find and view or review a specific page.
Additional Problems
For iTeach Online, we finally decided to break the modules up because we could export a module and then import it two or three times and in each duplicate module remove enough entries so the total number of entries would be under 20. The net result would be the revised Module 1a, 1b, 1c and so on where each new module would have less than 20 entries and the student would need to complete all of them as part of what the syllabus called “Module 1.”

So we tried it and found two more bugs. When you export and then import a Learning Module, Web Links are not imported. In our case the most time consuming aspect of the task was not avoided (e.g. creating Web Links and identifying the specific URL for each).

We also discovered that even though Blackboard doesn’t allow duplicate, identical names for assessments, if you import a Learning Module that has an assessment link in it, the assessment is duplicated with the very same name. The import process also ignores the release criteria for the quiz when it creates the duplicate. That means students will see the quizzes and they’ll be available immediately…which will cause confusion.

We are detailing these bugs because, even if you’ve avoided encountering them early in your course, you may still encounter problems if later modules include 20 or more entries. Blackboard has the TOC fix planned for Application Pack 2, tentatively scheduled for Spring 2007. So at best, we’ll have a fix for Summer 2007…we’re still looking for an effective work-around.

Monday, February 05, 2007

Custom Instructions vs. Assessment Descriptions

You may find the following explanation of the differences between an assessment "Description" and "Custom Instructions" beneficial.

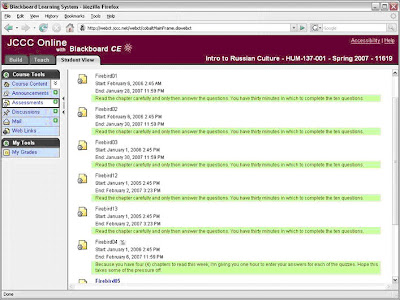
“Custom Instructions” as labeled by Blackboard may be different than expected. It is easy to expect “Custom Instructions” to show up on the Assessments page before students begin assessments. The fact is, “Custom Instructions” don’t appear until the students starts the assessment.

In order for notes or instructions regarding the assessment to show before the assessment is begun (on the Assessments page) enter them using the Description field (near the top of the assessment properties page) rather than the Custom Instructions field (at the bottom of the assessment properties page).

Assessment properties are accessed via the ActionLink icon using the Edit Properties option. “Custom Instructions” appear inside the assessment (see the area accented in green).

Descriptions appear on the Assessments page, outside the assessment, that is, before the assessment is begun.

To enter either a Description or Custom Instructions select the Edit Properties option from the specific assessment's ActionLink icon (see below).

The Description field is near the top and the Custom Instructions section is near the bottom.


Thanks to Davy Jones for documenting this information.


Saturday, February 03, 2007

Student Access Dates

This semester, at faculty request, we enabled student access to all Blackboard course shells on the first day of the semester (unless the instructor requested otherwise through the Help Desk). As a result courses starting on the first day of the semester did not show on the students' My Blackboard screen until the first day of the semester. This caused students who had already enrolled to think they were not enrolled and they called Admissions or contacted their instructor.

We’ll update the online student letter to be clearer about when courses show on the My Blackboard screen. Further, we’ve submitted a feature enhancement indicating the course should appear on the My Blackboard screen (after enrollment) as either an inactive link or (preferably) as an active link that when selected indicates class access starts on a specified date (e.g. the first day of the semester or the date set administratively at your request).

Friday, February 02, 2007

Have You Decided Not to Use That ePack After All?

If you create your course based on an epack that requires students to enter an access code and you decide to cease using the epack …read on!

If you start with a course based on an epack and strip out all course content that came with an epack (which you must legally do to no longer require students to purchase the access code), the new course will still require the access code. Even if you copy the course to a new course shell after deleting the epack content, the new course shell will still require students to use an access code.

The access code “trigger” is buried in the course shell and cannot be removed by you or the campus Blackboard server admin (that is, we do not have the tools or scripts required to do so, even if we could legally do so).

If you want to cease using an epack that requires an access code, you must start with a fresh course shell and build all content in that course shell.